About Animation
Animation components and Animation clips
Cocos Creator is a componentized structure. Animation is no exception, it is a component in the Node.
Animation clips
Animation clips, however, are documents for saving animation data. Animation clips need to be mounted to Animation components to enable the engine to smoothly apply animation data to the Node.
Index of node data
path is animation component relative path. So, only one data copy of the same name node.
clip params
sample: The number of frames per second data,default 60
speed: Animation speed,default 1
duration: Animation duration ( speed = 1 )
real time: Play continued real time
wrap mode: Play Mode
Animate Editing Mode
Animation in normal mode is not allowed to edit only in movie editing mode, to be able to edit the clip. But in edit mode, the node can not be added / deleted / renamed operation.
Open edit mode
- Select a node that contains the Animation, and contains more than one clip file. And then click on the button in the upper left corner of the animation editor.
Close edit mode
- Click the Edit button in the upper left corner of the animation editor. Or click the close button on the top left corner of the scene editor
Understanding animation editor
The Animation editor can be divided into 6 parts.
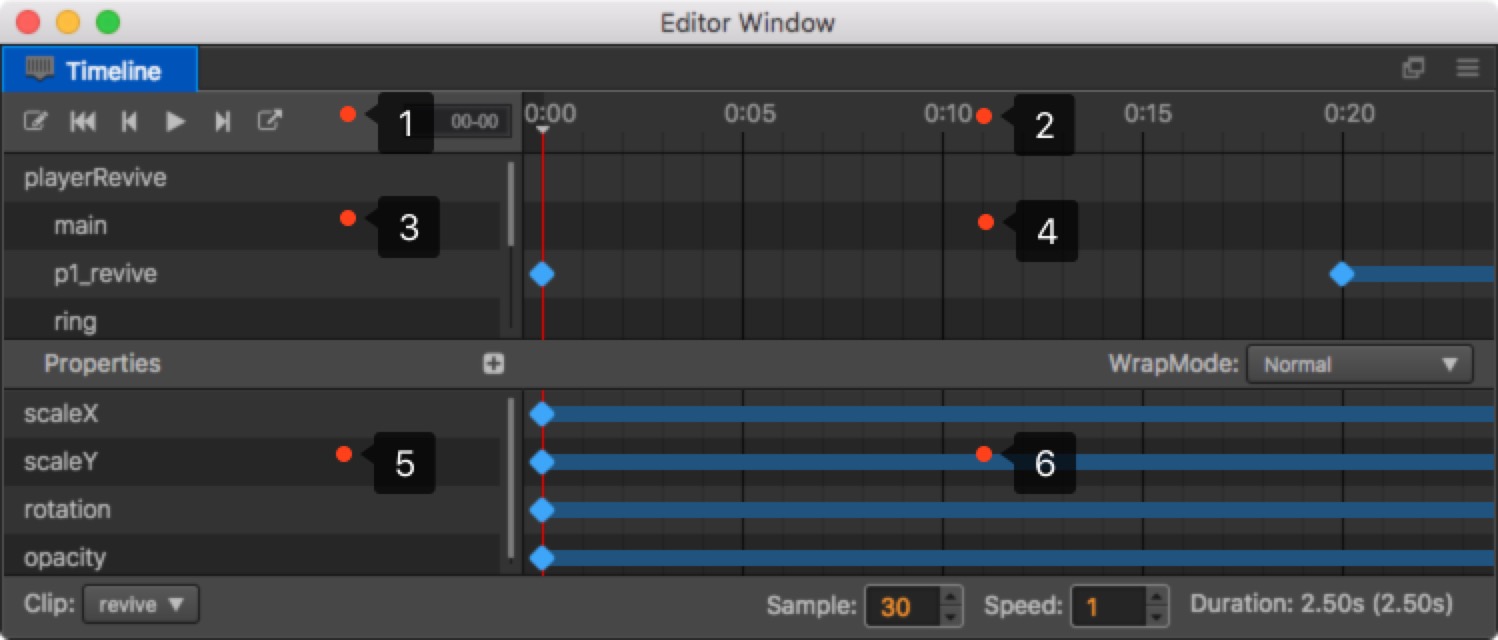
Common button field, which displays some common functional buttons, such as: (from left to right) recording status switch, back to the first frame, last frame, play/stop, next frame, create a new animation clip and insert animation event.
Timeline and event, which mainly displays timeline. The added user defined events will display here too.
Node Tree management, which includes node data that can be influenced by the current animation clip.
The preview field of the keyframe in nodes, which mainly displays the preview timeline of all the frames in each node.
Property list, which displays the property lists of the currently chosen node that has been included in the chosen animation clip.
Key frame. The frame corresponding to each property will display here.
The units of the timeline explained
The representation of the specific frame time on the timeline is 01-05. The value consists of two parts, the part in front of colon is the current number of seconds, followed by the current number of frames in the next second.
01-05 indicates that the current frame is at the time past 1 second and 5 more frames from the beginning of the animation.
Because the frame rate can be adjusted at any time, the time represented by the same frame will vary with the frame rate.
- When the frame rate is 30,
01-05means 1 + 5/30 = 1.1667 seconds after the animation starts. - When the frame rate is 10,
01-05means 1 + 5/10 = 1.5 seconds after the animation starts.
Although the time of current frame changes with the frame rate, but the total frames an animation takes going into a key frame is always the same. If we have frame rate set to 30 and add a key frame to the 01-05 time, that key frame is always the 35th frames from the beginningof the animation. Even if we change the frame rate to 10, the key frame is still the 35th of the whole animation, but the time of the key frame now reads as 03-05. It is three times the value of the time before.
Basic operation
Modify the zoom proportion of timeline
- Scroll the mouse wheel in area 2, 4, 6 of the image, and the display percentage of the timeline can be zoomed in/out.
Modify the display area of timeline
Press Shift button on the keyboard, left-click area 2, 4, 6 in the image and drag it to the left/right.
Press down the middle mouse button in area 2, 4, 6 in the image and drag it.
Modify the currently chosen timeline node
Click or drag any position in the timeline (area 2) area, you can modify the current time node.
Drag the marked red line in area 4.
Enter/exit recording status
There is a red button on the left side of graph 1. Click it and you will open/close the recording status.
The adding and deletion of the property frame and path will automatically open the recording status.
The playing of the animation will automatically open the recording status.
When playing, operations like saving the scene, etc., will close the recording status.
Play/stop animation
Click the Play button in graph 1, which will automatically turn into Stop. Click the button again and the animation will be stopped.
When playing, operations like saving the scene, etc. will stop playing.
Shortcut key
left:previous frame
right:next frame
delete:Delete the selected keys
k:Forward the animation
j:Backward animation
ctrl / cmd + left:Jump to the first frame
ctrl / cmd + right:Jump to the last frame
Continue on to read about Creating Animation component and animation clip.