Common UI Controls
This document describes commonly used non - core controls in the UI system, use the core rendering component, and alignment strategy. These controls will constitute the most interactive part of our game UI. You will understand the usage of the following UI control:
- ScrollView、ScrollBar and Mask
- Button
- ProgressBar
- EditBox
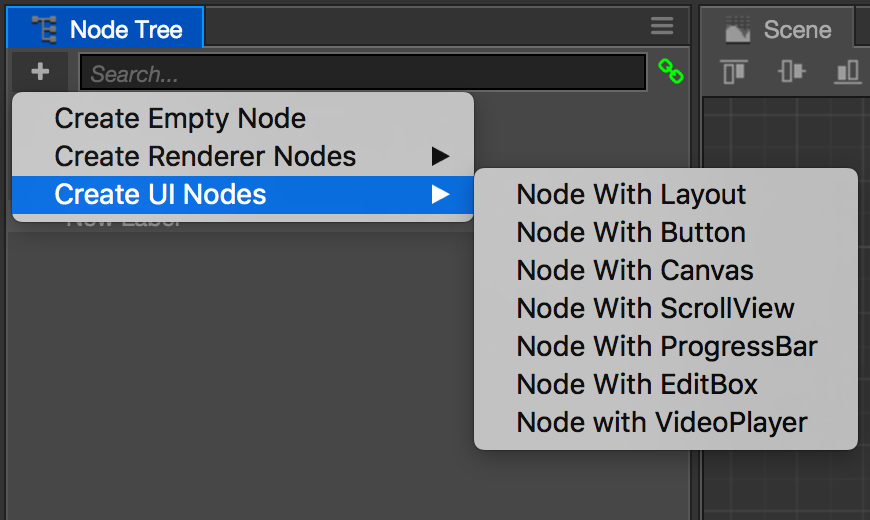
UI controls are described below can be passed Node Tree top left to create a node in the menu "Create UI Node" to create a submenu.
ScrollView
ScrollView is a typical combination of controls, usually consists of the following nodes:
ScrollView Root Node
This node contains the ScrollView components, detailed description of the component properties can refer to ScrollView component reference.
content Node
Used to host content node will be displayed in the scroll view's contents, the Constraint box of the node is usually far greater than the ScrollView the root node of the Constraint box, only when content node is larger than the ScrollView node, view scrolling can be effective.
Content can include any number of child nodes of the node, with Layout component. Constraint box ensures that the content node is equal to the sum of all the child nodes of the Constraint box.
Mask Node
ScrollView in the mask is optional, but we always want to be able to hide content that are beyond the scope of the ScrollView Constraint box in content.
Mask component ability to hide itself outside the scope of the content of child nodes of the Constraint box. Note Mask a rendering component, other rendering component and therefore cannot(Sprite, Label..) coexist on the same node, we need an extra node is designed to place the Mask. Otherwise the ScrollView Sprite will not be able to set the background for the component.
ScrollBar Node
The scroll bar is optional, on a mouse device, we can quickly scroll through the mouse to drag the scroll bar functions. And on mobile devices, scroll bars are often used to indicate the amount and scope of the currently displayed content.
We can also set the horizontal and vertical scroll bar, scroll bars for each node contains a ScrollBar component. Nodes can also include a scrollbar child node to display both the foreground and the background of a scroll bar. Detailed property to set the check ScrollBar component reference.
Also of note is that handle part of the ScrollBar size is variable, recommended Sliced mode Sprite as the handle of the ScrollBar.
Button
Button created by Node Tree menu node, by the parent with Button component and a child node with Label component composition. Button parent node provide interactive features and buttons background image display, label child nodes provide the label on the button text rendering.
You can design according to the art style and needs, removed Label node or replaced with other icon Sprite needs.
Detailed property descriptions available on Button components, please refer to Button component reference.
Transition Description
Transition property of the Button used to set up when the button is in normal (Normal), down (Pressed), the hover (Hover), Disabled (Disabled) Target four state property to refer to the background. You can choose from three modes:
NONE(Nothing Transtion), the mode button does not respond to interactive event to automatically change their appearance. But you can add a custom script on the button to precisely control the behavior of interactive performance.COLOR(Color Change), after choosing this mode, you can see four states property and can set a color overlay for each state. When the button to switch to the corresponding state, sets the color for button and the status color of the background image multiplying as the color of the display. This mode also allows the length of time byDurationproperty sets the color changing process, realization of color gradient effect.SPRITE(Image Change), after choosing this mode, aSpriteFrameimages can be specified for each of the four state resources, after the corresponding status is activated, button background image will be replaced with the corresponding image resources. Note if you want to setNormalpicture of the state of resources,SpriteFramein the background of the button Sprite properties will be overwritten.
Click Events
Click Events property is an array type, its length changed to 1 or more as button was pressed (mouse or touch) adds one or more response callback method. After you create new Click Events, you can drag the response component node to the callback method on the 'Target' property of the Click Events, then select a component node, and select components from a list in a method as a callback method.
Click event on Button is designed to facilitate designers in making UI interface you can specify button function when setting, you want the button to customize the response to a greater diversity of events, you can refer to Internal-Events for details, on the button node listens to these interactive events and manually handled.
ProgressBar
Progress is driven by the ProgressBar component of a Sprite node properties to achieve according to the set value displays the progress of different length or angle. ProgressBar has three basic operating modes (by setting the Mode property):
- HORIZONTAL
- VERTICAL
- FILLED
About other basic properties, please refer to ProgressBar component reference for details.
HORIZONTAL & VERTICAL Model
When Mode select HORIZONTAL or VERTICAL, the progress bar by modifying Bar Sprite dimensions of the reference node (width or height property), to change the progress bar shows the length. In both modes Bar Sprite is recommended to use Sliced mode, in case of node size stretch can still maintain a high quality image rendering.
In both modes, Total Length property is in pixels, used to specify the length of Bar Sprite when the progress bar is 100% (Progress property value is 1). This property ensures that when we edit scenes can freely set Progress to a value less than 1, the Bar Sprite always be able to record the total length of our hope.
FILLED Model
Different from the above two modes, Fill mode of the progress bar by a percentage cut Bar Sprite reference nodes to show progress. So we need to make specific settings for the Sprite component of the Bar Sprite reference. First set the sprite's Type property to FILLED. And then you can select a fill direction (HORIZONTAL, VERTICAL and RADIAL). Please refer to Sprite Filled Model for details.
Note that after the fill mode is selected in the progress bar, the unit of Total Length becomes a percentage, ranging from 0 to 1. The set value of Total Length is synchronized to the Fill Range property of Bar Sprite to make it consistent. The figure below shows the effect of different Total Length on the display when the Fill Type of Bar Sprite is set to RADIAL.

EditBox
Please refer to EditBox Component Reference for details.
Continue on to read about Auto Layout.